The Easy Tee
While wandering through the candyland of sewing blogs, I was introduced to "Me Made May". A movement of sewers have come together since 2010 and they dedicate themselves to wearing their handmade clothes all throughout the month of May. Wow!! I wanted to do this! Of course 99% of my handmade clothing is of the wool knit variety, so May isn't really the ideal time for me to be sporting them. So I've been trying to take this opportunity to beef up my sewn handmade garments so I'll be all ready for May '15 and hopefully one day not just May, but all year round.
I came across this blog posting from Miss P for simple kimono tee. After my recent run-in with a set-in sleeve, I was so very attracted to this particular silhouette. I'm also in desperate need for more simple, throw-on and go summer shirts.
Starting with her template of creating a rectangle and working from there, I came up with a slightly altered version. Here is the schematic I ended up using for my final easy tee:

© mishi2x Designs LLC
These are the personalizations I made from Miss P's template:
- I raised the back neck so it's only 1" deep. I didn't want the shirt to shift forwards and backwards while I was wearing it.
- I extended the shoulder seam out 1" so that the top of the sleeve is a bit longer.
- And then I followed her example and made it a wee bit of an a-line.
- I also added the curved detail at the side seams, like her photos.
After I drew up my schematic, I took out my pattern paper and made two pattern pieces, one for the front and one for the back and added 1/2" seam allowances all around.

And then I chose a chambray fabric for the top. Like my previous blouse this ended up being a bit stiffer than I had expected, but I'm hoping it'll soften up once I wear and wash it more. I prewashed it, ironed it and got to cutting.
I serged around the necklines, both on the front and the back. I know you're supposed to do that after the shoulder seams are together so you have one continuous circle for the neckband. But I've noticed in some of the japanese sewing books I have that they have you finish each piece and then assemble. I thought I'd give it a try. It's easier to finish off half a circle, than a full round anyway.
I marked my seam allowance in chalk so I had something to follow at the serger.

Serged along that line - making sure the leftmost needle is on the seam line, not the blade.

Using the serged seam as a guide, I folded it over to the wrong side and ironed.

Thermal Thimbles - one of the greatest inventions!
If I may mention now - those blue things are called Thermal Thimbles and they are an absolute must. I was tired of burning my fingers when ironing and I had bought some gloves that hair stylists use when using heating products. But I had no control over the fabric. So when I saw these on Nancy's Notions, I gave them a try and am a total convert. Not only do the protect you fingers, but they give you additional grip so you can more easily manipulate fabric while you're ironing.
Once I ironed them flat, I edgestitched them down for a clean finish.

The downside is now you've got these shoulder seams that aren't tacked down.
So I hand stitched those down for just about an inch or so using a straight hem stitch. I'll have to try the more traditional way next time. But it did make for easy serging along the neck.
I sewed up the side seams, serged those to finish. Serged the armhole openings, turned those under and topstitched about 1/4" in.
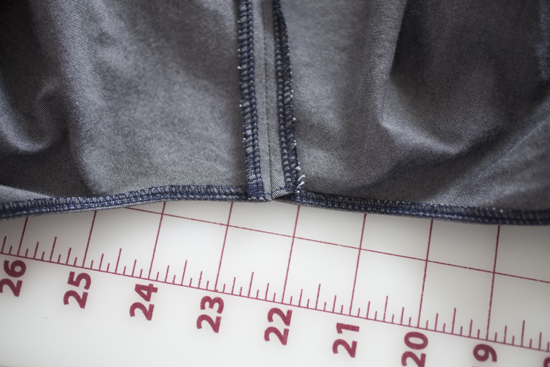
And then got to the hem... I didn't really know what to do with that curved bit. I could just hem it all the way around turning it up, but it got a little funky right at the side seam. So I opened up the side seam about an inch up, and serged each bottom hem separately - front and back.
Then I turned those to the wrong side and edgestitched those just like the neck. Since I had ripped open the side seam, I had to close it back up again. I did a few backstitches about 3/4" up to leave a little opening at each side seam. If I had thought that part through a bit more it wouldn't look so odd.

The Oddity
Maybe if I stitch up and around the opening it'll seem more deliberate? *shrug*
And that's it! The serged seam may not be the most elegant, but I love it. Fast, simple and does the job. I happily used it on every seam.
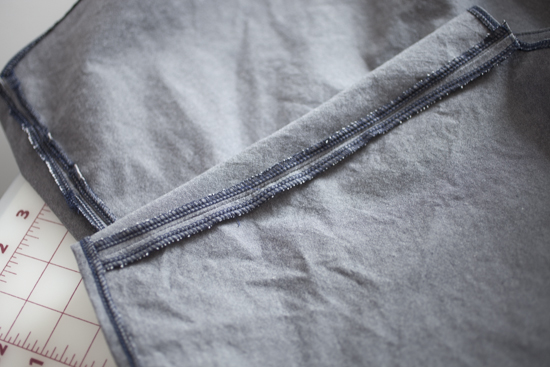
Serging happiness

The Easy Tee
OK, I have to get back to my Breton Tee that has been languishing. I'm going to give that back shoulder/neck binding area one more go, and if I still can't figure it out, I'm putting one big neckband all the way around. And, I think I need to try this Easy Tee in something less austere like a Nani Iro fabric, or in a Liberty print.